
Create React App

2021-10-05#

List#

  • Display a Note
  • Render the Note Form

Display a Note#

Add the Routes#

src/Route.js

import Notes from "./containers/Notes";
<Route exact path="/notes/:id">
<Notes />
</Route>
  • 루트 경로 /notes/:id를 사용함으로써 우리는 라우터에게 해당되는 경로에 컴포넌트인 Notes를 설정함
  • /notes/new 경로의 new의 id와 매칭 시킨 결과도 가져올 수 있으므로 이를 방지하기 위해 /notes/new 경로의 뒤에 선언

src/containers/Note.js

import React, { useRef, useState, useEffect } from "react";
import { useParams, useHistory } from "react-router-dom";
import { API, Storage } from "aws-amplify";
import { onError } from "../lib/errorLib";
export default function Notes() {
const file = useRef(null);
const { id } = useParams();
const history = useHistory();
const [note, setNote] = useState(null);
const [content, setContent] = useState("");
useEffect(() => {
function loadNote() {
return API.get("notes", `/notes/${id}`);
}
async function onLoad() {
try {
const note = await loadNote();
const { content, attachment } = note;
if (attachment) {
note.attachmentURL = await Storage.vault.get(attachment);
}
setContent(content);
setNote(note);
} catch (e) {
onError(e);
}
}
onLoad();
}, [id]);
return (
<div className="Notes"></div>
);
}
  • useEffect Hooks 에서 로드를 메모한 후 React 상태를 저장함. React Router와 함께 제공되는 useParams Hooks를 통해 id를 사용하여 URL에서 메모를 얻음

  • 첨부 파일이 있는 경우 키를 사용하여 S3에 업로드한 파일에 대한 보안 링크를 얻음

  • note와 함께 상태의 객체를 갖는 이유는 나중에 사용자가 메모를 편집할 때 이것을 사용할 것이기 때문임

Render the Note Form#

src/containers/Notes.js

import Form from "react-bootstrap/Form";
import LoaderButton from "../components/LoaderButton";
import config from "../config";
import "./Notes.css";
const [isLoading, setIsLoading] = useState(false);
const [isDeleting, setIsDeleting] = useState(false);
function validateForm() {
return content.length > 0;
}
function formatFilename(str) {
return str.replace(/^\w+-/, "");
}
function handleFileChange(event) {
file.current = event.target.files[0];
}
async function handleSubmit(event) {
let attachment;
event.preventDefault();
if (file.current && file.current.size > config.MAX_ATTACHMENT_SIZE) {
alert(
`Please pick a file smaller than ${config.MAX_ATTACHMENT_SIZE /
1000000} MB.`
);
return;
}
setIsLoading(true);
}
async function handleDelete(event) {
event.preventDefault();
const confirmed = window.confirm(
"Are you sure you want to delete this note?"
);
if (!confirmed) {
return;
}
setIsDeleting(true);
}
return (
<div className="Notes">
{note && (
<Form onSubmit={handleSubmit}>
<Form.Group controlId="content">
<Form.Control
as="textarea"
value={content}
onChange={(e) => setContent(e.target.value)}
/>
</Form.Group>
<Form.Group controlId="file">
<Form.Label>Attachment</Form.Label>
{note.attachment && (
<p>
<a
target="_blank"
rel="noopener noreferrer"
href={note.attachmentURL}
>
{formatFilename(note.attachment)}
</a>
</p>
)}
<Form.Control onChange={handleFileChange} type="file" />
</Form.Group>
<LoaderButton
block
size="lg"
type="submit"
isLoading={isLoading}
disabled={!validateForm()}
>
Save
</LoaderButton>
<LoaderButton
block
size="lg"
variant="danger"
onClick={handleDelete}
isLoading={isDeleting}
>
Delete
</LoaderButton>
</Form>
)}
</div>
);
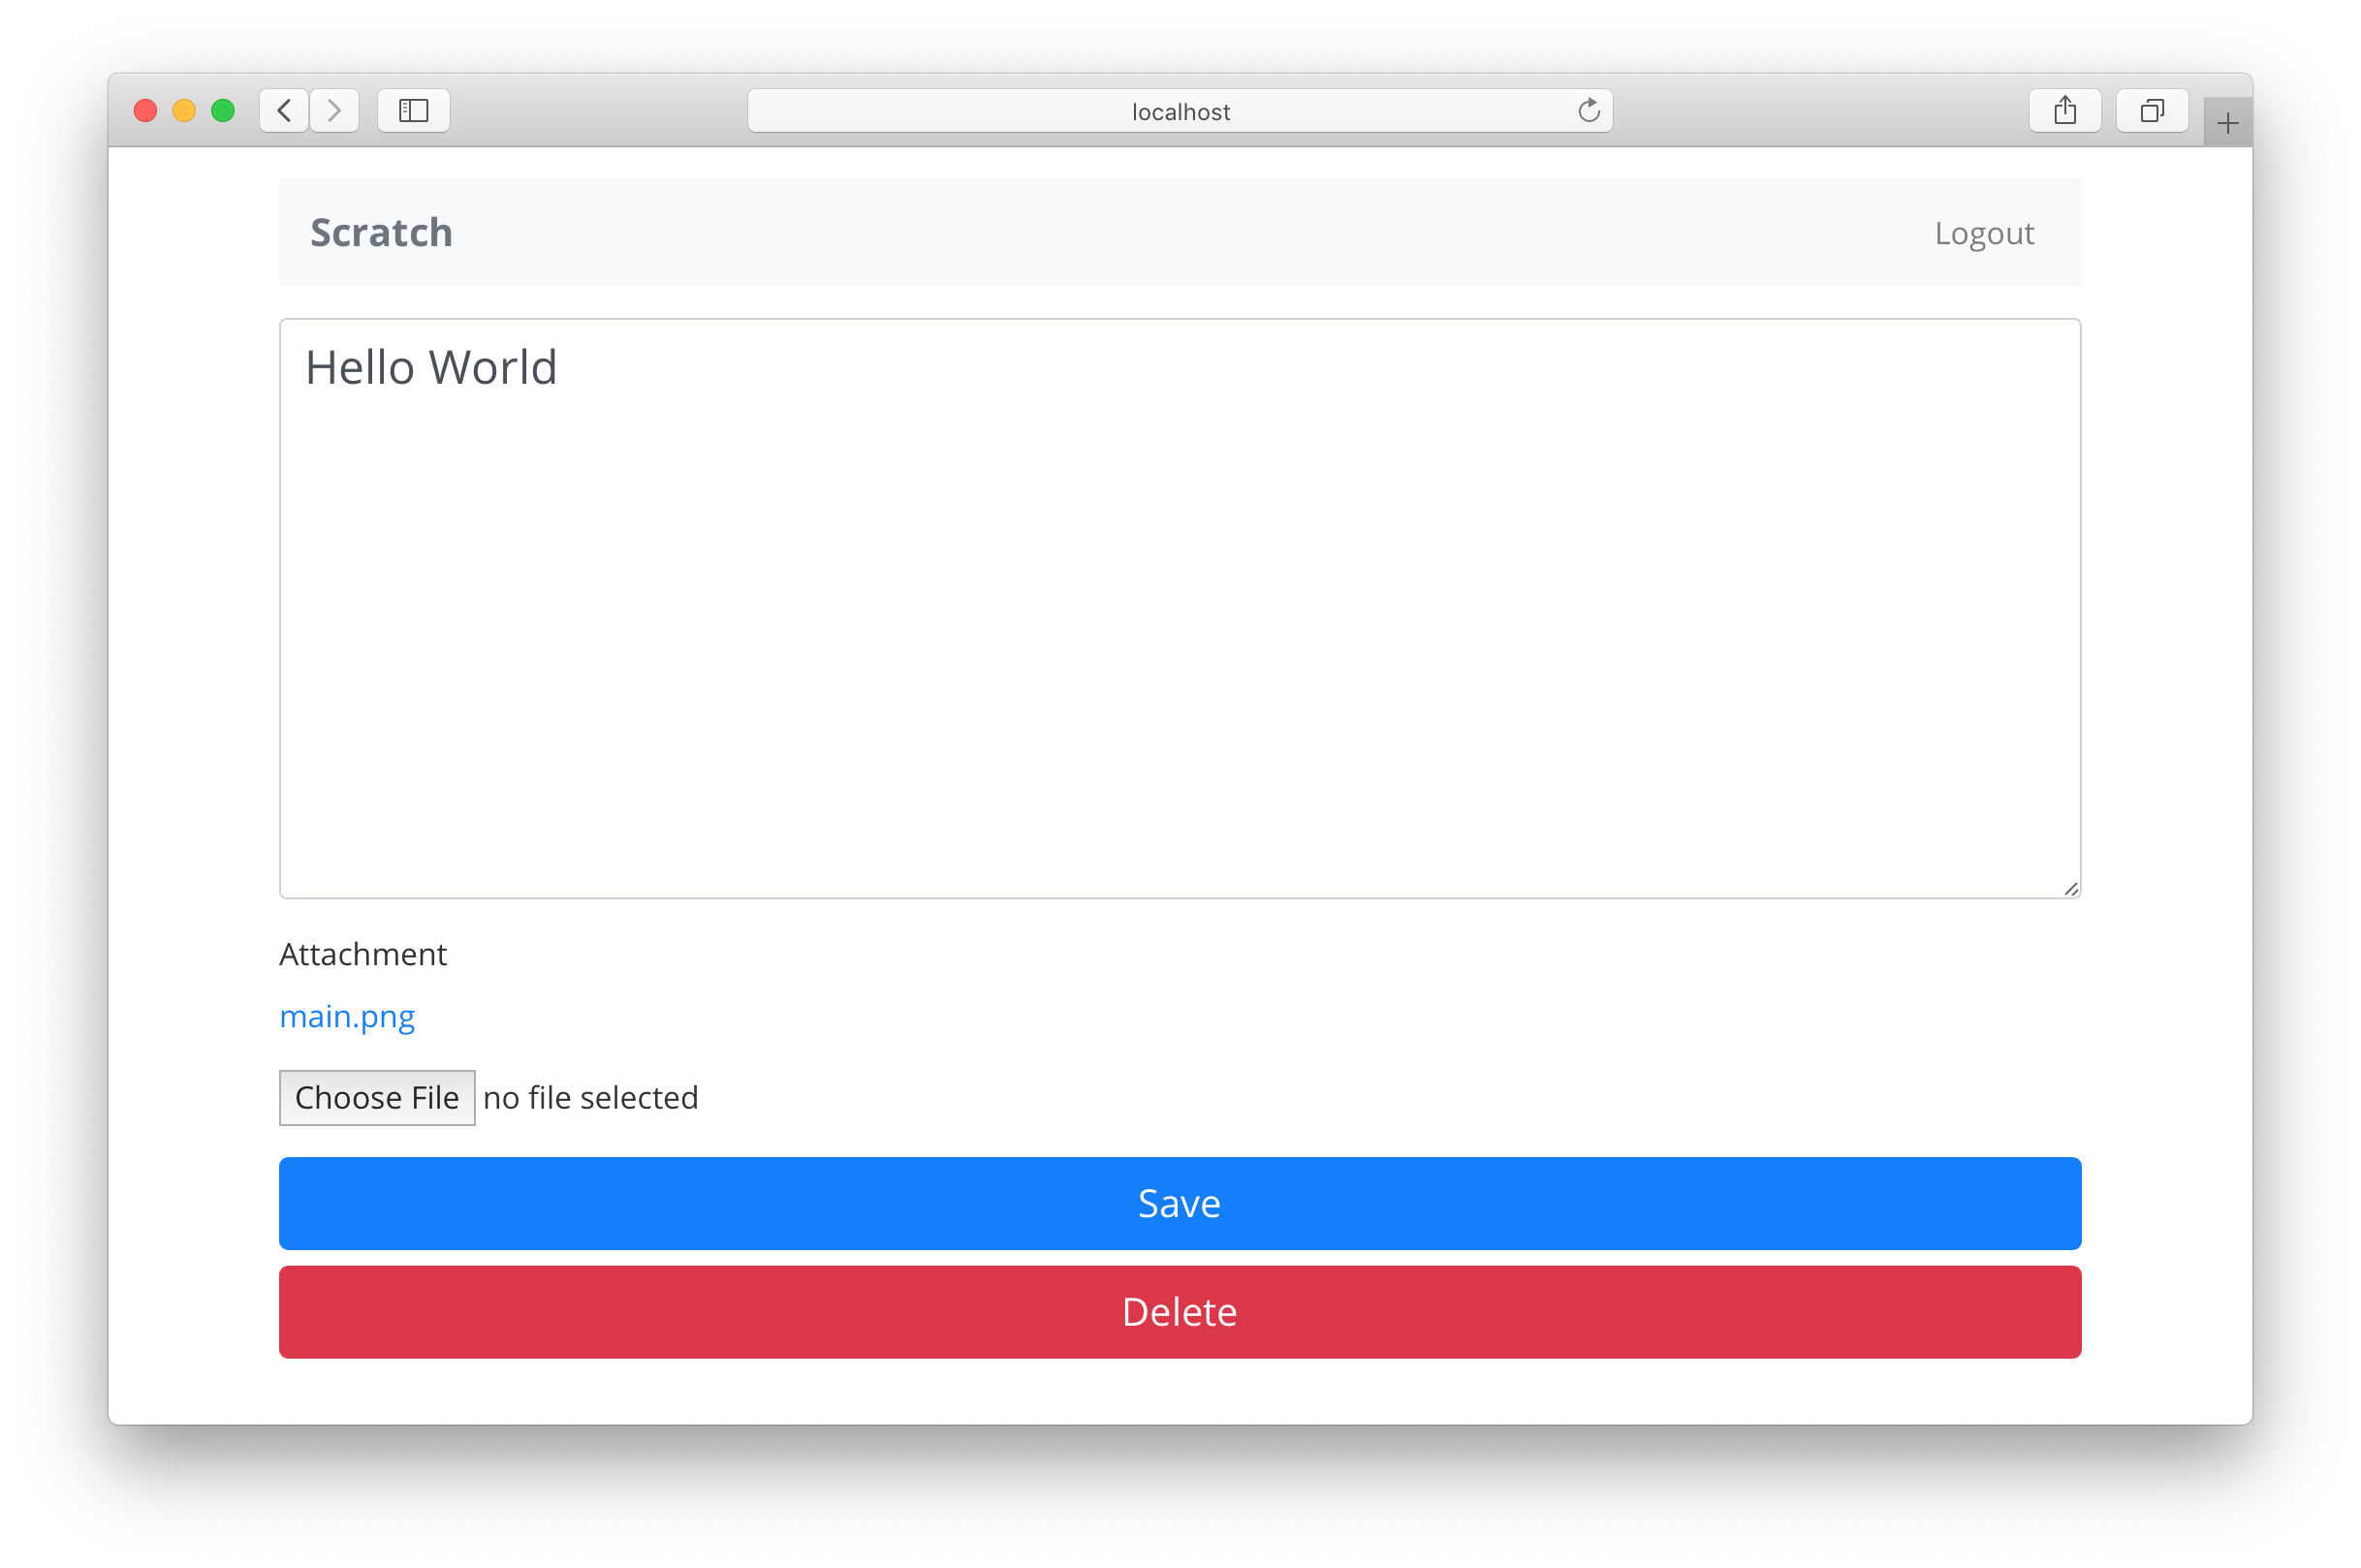
  • note 상태 변수가 설정된 경우에만 양식을 렌더링

  • 양식 내에서 note.attachment를 사용하여 첨부 파일을 표시하는 부분을 조건부로 렌더링

  • formatFilename 업로드하는 동안 파일 이름에 추가한 타임스탬프를 제거 하여 첨부 URL 형식을 지정

  • 또한 사용자가 메모를 삭제할 수 있도록 삭제 버튼을 추가하고, 제출 버튼과 마찬가지로 호출이 진행 중임을 알리는 플래그를 설정 isDeleting.

  • NewNote 컴포넌트 에서 했던 것과 똑같은 방식으로 파일 입력으로 첨부 파일을 처리

  • 삭제 버튼은 사용자가 브라우저의 confirm 대화 상자를 사용하여 메모를 삭제할 것인지 확인

notes-page-loaded

2021-10-12#

List#

  • Delete a Note
  • Set up Secure Pages
  • Create a Route That Redirects

Delete a Note#

src/containers/Notes.js

function deleteNote() {
return API.del("notes", `/notes/${id}`);
}
async function handleDelete(event) {
event.preventDefault();
const confirmed = window.confirm(
"Are you sure you want to delete this note?"
);
if (!confirmed) {
return;
}
setIsDeleting(true);
try {
await deleteNote();
history.push("/");
} catch (e) {
onError(e);
setIsDeleting(false);
}
}

note-page-deleting

Set up Secure Pages#

사용자 인증과정 준비

  • 라우팅 전에 사용자가 인증되었는지 확인하는 AuthenticatedRoute라는 경로 생성

  • 그리고 사용자가 인증되지 않았는지 확인하는 UnauthenticatedRoute라는 구성 요소 생성

Create a Route That Redirects#

src/components/AuthenticatedRoute.js

import React from "react";
import { Route, Redirect, useLocation } from "react-router-dom";
import { useAppContext } from "../lib/contextLib";
export default function AuthenticatedRoute({ children, ...rest }) {
const { pathname, search } = useLocation();
const { isAuthenticated } = useAppContext();
return (
<Route {...rest}>
{isAuthenticated ? (
children
) : (
<Redirect to={
`/login?redirect=${pathname}${search}`
} />
)}
</Route>
);
}
  • AuthenticatedRoute 컴포넌트의 props에 children이 존재(모든 react 컴포넌트 동일) 현재 경우 하위 구성 요소의 예는 NewNote, Notes

  • AuthenticatedRoute 컴포넌트는 Route 컴포넌트 반환

  • useAppContext Hooks를 사용하여 사용자가 인증되었는지 확인

  • 사용자가 인증되면 children구성 요소를 렌더링, 사용자가 인증되지 않은 경우 Redirect React Router 구성 요소를 사용하여 사용자를 로그인 페이지로 리디렉션

  • 또한 로그인 페이지의 현재 경로( redirect쿼리 문자열)를 전달, 나중에 이것을 사용하여 사용자가 로그인한 후 다시 리다이렉션 처리하며, useLocationReact Router 후크를 사용하여 이 정보를 습득

2021-10-19#

List#

  • Hexo Blog

2021-10-26#

List#

  • Serverless Stack

Serverless Stack#

Docs SST**

서버리스 스택(SST)은 서버리스 앱을 쉽게 구축할 수 있는 프레임워크라고 소개되어 있다.

2021-10-24일 기준으로 현재 SST는 JavaScript, TypeScript, Python, Golang 및 C#을 지원하고 있다.

LanguageCDKLambda
JavaScript
TypeScript
GoComing soon
PythonComing soon
C#Coming soon
F#Coming soon

SST 프레임워크를 사용하면 앱에서 필요한 인프라스트럭쳐를 코드로(AWS CDK 사용) 정의하고, AWS Lambda 함수를 보다 간편하게 구성할 수 있다.

디자인 원리#

SST는 몇가지 핵심 원리를 가지고 설계된 프레임워크이다.

  • 점진적 공개
  • 구조의 설정
  • 권한 부여
  • 제로베이스 구성

점진적 공개#

서버리스 앱을 구축하기 위해 SST가 제공 하는 구성은 점진적 공개 라는 아이디어를 기반으로 한다. 기본 구성이 간단하고 이해하기 쉬우며 환경파악에 용이하며, 더 복잡한 사용 사례에 대해 점진적으로 사용자가 쉽게 지정할 수 있는 장점이 있다.

구조의 설정#

Api Routes에 간단한 예시

new Api(this, "Api", {
routes: {
"GET /notes": "src/list.main",
"POST /notes": "src/create.main",
},
});

이러한 형태는 정의한것을 쉽게 이해할 수 있다. 만약 커스텀한 함수 속성이 필요하다면 아래와 같이 추가할 수 있다.

new Api(this, "Api", {
defaultFunctionProps: {
srcPath: "src/",
environment: { tableName: table.tableName },
},
routes: {
"GET /notes": {
function: {
handler: "list.main",
srcPath: "services/functions/",
},
},
"POST /notes": "create.main",
},
});

권한 부여#

SST는 attaching function을 통해 권한을 부여한다.

아래 cronjob 설정에 대한 예를 살펴보자

const cron = new Cron(this, "Cron", {
schedule: "rate(1 minute)",
job: "src/lambda.main",
});

cronjob에 대한 접근권한을 부여에 대한 예시

// cronjob 함수에 모든 접근권한 부여
cron.attachPermissions(PermissionType.ALL);
// 특정 리소스에만 접근권한 부여
cron.attachPermissions(["s3"]);
import { PolicyStatement, Effect } from "@aws-cdk/aws-iam";
// IAM 정책으로 권한부여
cron.attachPermissions([
new PolicyStatement({
actions: ["execute-api:Invoke"],
effect: Effect.ALLOW,
resources: [
`arn:aws:execute-api:${region}:${account}:${api.httpApiId}/*`,
],
}),
]);

제로베이스 구성#

SST를 프레임워크가 탄생한 가장 큰 이유 중 하나는 서버리스 개발 환경이 항상 부족하다고 느꼈기 때문이라고 한다.

  • 부족한 점
    • Live Lambda Development 가 해결하려고 하는 긴밀한 피드백 루프가 부족
    • 여러 플러그인, Webpack, Babel, TypeScript, 테스트 프레임워크, 린터 등을 구성해야 함
    • 설정은 종종 깨지기 쉽고 최신 상태를 유지하기 위해 별도의 프로젝트 유지 관리자에 의존

위에 부족한 점들로 인해 Serverless 환경에 많은 경험이 있는 개인 개발자라면 괜찮겠지만 더 큰 팀의 일원이거나 이제 막 서버리스를 시작하는 경우 개발 환경을 시작하고 실행하는 것이 매우 어려운 점 발생한다.

SST의 설계 원칙 중 하나는 개발 환경이 기본적으로 작동하는지 확인하는 것이며, 구성이 거의 또는 전혀 필요하지 않는것이 핵심 원칙이다.

Quick Start#

Node 환경에서 아래 명령어로 빠르게 SST 프로젝트를 생성할 수 있다.

# Create your app
npx create-serverless-stack@latest my-sst-app
cd my-sst-app
# Start Live Lambda Development
npx sst start
# Deploy to prod
npx sst deploy --stage prod